Are you dealing with high energy bills and drafts at home? Closed-cell spray foam kits could be your saving grace. They offer a simple and effective way to make your home more energy-efficient.
Closed-cell spray foam is widely used by homeowners and contractors. It provides high-performance insulation with an R-value of 6.89 per inch. This is significantly higher than traditional fiberglass insulation.
What makes these DIY kits stand out is their ease of use. You can achieve professional results even on your first try. Each kit includes clear instructions, support resources, and helpful how-to videos. Many options also come with a defect-free guarantee, giving you peace of mind.
This type of foam is also environmentally friendly. It does not contain harmful chemicals like CFCs or formaldehyde. It acts as a vapor barrier and reduces air leakage and heat transfer. As a result, it helps lower heating and cooling costs.
When you're ready to improve your home's energy efficiency, spray foam kits are a reliable solution. They are easy to use and provide long-lasting performance. You can enjoy a warmer, draft-free home with minimal effort.
Key Takeaways on Closed-Cell Spray Foam Insulation
-
Spray foam offers a high R-value of 6.89 per inch
-
DIY kits are beginner-friendly with full support and instructions
-
Closed-cell foam acts as a vapor barrier and air sealant
-
Eco-friendly formula without harmful chemicals
-
Helps reduce energy bills and improve indoor comfort
Understanding DIY Closed-Cell Spray Foam Insulation
What Is a DIY Spray Foam Insulation Kit?
A DIY spray foam insulation kit includes two chemical components that mix during application to create expanding foam. These kits are designed for small to medium projects and typically cover up to 400 square feet.
They are easy to use and require no professional experience. This makes them ideal for insulating sheds, attics, walls, or roofs. Many homeowners rely on a closed-cell foam kit to complete insulation upgrades efficiently without hiring professionals.
Benefits of Closed-Cell Spray Foam for Homes
Closed-cell spray foam offers superior insulation compared to fiberglass. It provides excellent thermal resistance, helping maintain indoor temperatures.
It also blocks moisture, reducing the risk of mold and mildew. This makes it suitable for both indoor and outdoor applications. Additionally, it improves structural strength and durability.
Using spray foam reduces energy consumption. It seals gaps and prevents heat loss, leading to noticeable savings on energy bills. Many homeowners experience improved performance after understanding the spray foam efficiency in different climate conditions.
Closed-Cell Spray Foam vs Fiberglass Insulation
|
Feature |
Closed-Cell Spray Foam |
Fiberglass Insulation |
|
R-Value per inch |
~6.5 – 6.89 |
~2.9 – 3.8 |
|
Air Sealing |
Excellent (airtight barrier) |
Poor (allows air leaks) |
|
Moisture Resistance |
High |
Low |
|
Mold Prevention |
Strong |
Weak |
|
Durability |
Long-lasting |
Can sag over time |
|
Installation |
DIY kits available |
Easy but less effective |
|
Energy Savings |
High |
Moderate |
Closed-cell spray foam clearly outperforms fiberglass in insulation performance. It also provides better air sealing and moisture protection. This makes it a preferred option for long-term energy efficiency.

Why Choose Closed-Cell Spray Foam for DIY Projects
Closed-cell insulation is a strong solution for sealing gaps and cracks. It acts as a vapor barrier, preventing air leaks and heat escape. This improves both comfort and efficiency.
Spray foam outperforms traditional insulation in both R-value and air sealing. It provides long-term savings by lowering energy costs. Once applied and cured, it requires minimal maintenance.
It is also a versatile option for home upgrades and repairs. It enhances insulation, reduces noise, and improves overall indoor conditions. Many property owners consider the key insulation benefits before choosing this solution.
Comparison: Closed-Cell vs Open-Cell Spray Foam
|
Feature |
Closed-Cell Foam |
Open-Cell Foam |
|
Density |
High |
Low |
|
R-Value per inch |
~6.5 – 6.89 |
~3.5 – 3.8 |
|
Moisture Barrier |
Yes |
No |
|
Air Barrier |
Excellent |
Good |
|
Structural Strength |
Adds rigidity |
Minimal support |
|
Cost |
Higher |
Lower |
|
Best Use |
Exterior, roofs, basements |
Interior walls, soundproofing |
Closed-cell foam provides stronger insulation and moisture resistance. Open-cell foam is more affordable but less effective in demanding environments. Understanding the foam type differences helps in choosing the right material.
How to Determine the Right Insulation Thickness
How Many Inches of Foam Should You Apply?
The required thickness depends on climate and usage. For air-conditioned spaces, it is generally recommended:
-
Walls: 2 inches (R-13)
-
Roofs: 3 inches (R-20)
For non-air-conditioned spaces, a 1-inch layer (R-6.5) is often sufficient. This helps reduce heat transfer and improves comfort.
Calculating Board Feet for Spray Foam Kits
To calculate how much foam you need:
-
Multiply the area (square feet) by the desired thickness (inches)
-
This gives you the required board feet
Most DIY kits range from 200 to 1200 board feet. Smaller kits are easier to handle, especially for solo projects. It is recommended to purchase extra material to account for waste and uneven application. A detailed DIY insulation guide can help refine these calculations.
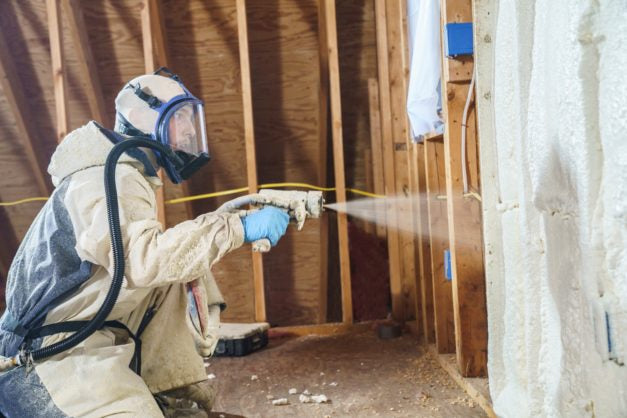
Personal Protective Equipment (PPE) for Spray Foam Projects
Essential Safety Gear for Application
Proper PPE is necessary when working with spray foam. It protects you from chemicals and fumes during application.
Required equipment includes:
-
Respirator with appropriate filters
-
Protective gloves
-
Safety goggles
-
Protective suit or coveralls
-
Protective footwear or boot covers
Spray foam is difficult to remove once it sticks. Wearing proper gear ensures safety and prevents skin or respiratory exposure.
Always check PPE before starting your project. Follow safety guidelines for re-entry times after application.
Preparing Your Space for Spray Foam Insulation
Protecting Surfaces from Overspray
Preparation is essential for a successful project. Cover nearby areas like windows, floors, and furniture with thick plastic sheets.
Secure coverings with tape, glue, or staples. This prevents foam from sticking to unwanted surfaces. Proper containment saves time and cleanup effort.
Ventilation Requirements for Safety
Good ventilation is critical during application. Spray foam releases fumes that must be removed from the area.
To improve airflow:
-
Open windows and doors
-
Use fans to circulate air
-
Ensure continuous ventilation during and after spraying
This helps maintain a safe working environment.
Surface Conditions for Proper Adhesion
The surface must be clean, dry, and stable before spraying. Suitable materials include plywood and drywall.
Temperature is also important. The surface should be at least 65°F, with optimal conditions between 75°F and 100°F. This ensures proper expansion and adhesion of the foam.

Personal Protective Equipment (PPE)
Spray foam projects need proper PPE for safety.6 This includes masks, eye protection, and gloves.
Proper Gear for Spraying Foam
The right PPE for spraying foam includes a Tyvek suit and a respirator. It also needs gloves and shoes to keep chemicals off you.
Because spray foam is hard to get off, PPE is vital. It protects you from the foam and its fumes.
Different SPF chemicals require special PPE. A supplier can tell you the safe times to re-enter after spraying.
Clothing like coveralls and special boots are crucial. Gloves help against certain materials. Eye and breathing protection are also needed.
Choosing the right respirator depends on where you're working. Checking PPE before starting is very important.
Project Preparation
Starting a DIY closed-cell spray foam insulation project means you need to get ready right. Making sure the area is clean and covered stops the spray from going everywhere. You cover windows, floors, and more with thick plastic, holding it down with tape, glue, or staples.
Protecting Areas from Overspray
Covering and sealing off where you’ll work is very important. This keeps the spray foam off places you don’t want it. Since spray foam is messy, it’s hard to clean if it gets on other things. So, containing the area well saves you trouble later.
Ventilation Requirements
Good ventilation is a must for a safe DIY spray foam job. The fumes can be harmful, so it's best to let them out. Open windows and doors, and use fans to make sure the air moves and takes the fumes away.
Substrate Conditions for Spraying
Before you spray foam, the surface needs prep. It has to be dry and stable. Things like plywood or drywall work. Also, it should be not too cold, at least 65°F. The best temperatures are between 75 and 100°F for the foam to stick well.

Application Tips for Maximum Spray Foam Yield
Best Practices for Spraying Foam
To get the best results:
-
Warm the components to 75–100°F
-
Shake the tanks for 1–2 minutes
-
Start by spraying a border around the area
-
Apply foam in thin layers (no more than 2 inches at a time)
Allow each layer to expand and cure before adding the next. This prevents over-expansion and ensures even coverage.
Combining Spray Foam with Fiberglass Insulation
A cost-effective method is the “flash and batt” technique. This combines spray foam with fiberglass insulation.
Steps:
-
Apply a thin layer of spray foam for air sealing
-
Fill the remaining space with fiberglass
For example, in 2x4 walls:
-
Spray under 2 inches of foam
-
Add fiberglass to reach an R-17.3 value
This approach reduces costs while maintaining insulation performance. In some cases, homeowners also explore open-cell options for interior applications.
Is DIY Spray Foam Insulation Worth It?
Closed-cell spray foam kits provide an effective DIY solution for home insulation. They improve energy efficiency, reduce air leaks, and enhance indoor comfort over time. This makes them a practical option for both small upgrades and larger renovation projects.
These kits are designed to be user-friendly, even for beginners. They include the essential tools and guidance needed for a smooth application process. With proper use, they can help lower energy bills and create a more stable indoor environment throughout the year.
When selecting insulation, it is important to consider factors like R-value, project size, and climate conditions. Understanding these elements helps ensure better performance and long-term results. Those comparing different insulation approaches or exploring material options often find it useful to review available solutions from VB insulation or get clarity through the Connect with VB insulation expert team page for more tailored insights.
closed-cell spray foam offers a durable and energy-efficient solution. When applied correctly, it supports long-term savings while improving comfort and building performance.
FAQs About Closed-Cell Spray Foam Insulation
What are the benefits of closed-cell spray foam insulation?
Closed-cell spray foam provides excellent insulation, air sealing, and moisture resistance.
It keeps indoor spaces comfortable and reduces energy costs.
Key benefits include:
-
High R-value for better insulation
-
Air sealing to prevent drafts
-
Moisture resistance to reduce mold risk
How do I calculate how much spray foam I need?
You calculate it by multiplying the area by the thickness in inches.
This gives you the total board feet required.
Steps:
-
Measure total square footage
-
Decide thickness in inches
-
Multiply both values
What PPE is required for spray foam insulation?
You must wear protective gear to prevent exposure to chemicals.
This ensures safety during application.
Required PPE:
-
Respirator
-
Gloves
-
Goggles
-
Protective suit
How should I prepare the area before spraying foam?
You need to clean, cover, and ventilate the space before starting.
Proper preparation ensures better results and safety.
Preparation steps:
-
Cover surfaces with plastic
-
Ensure proper ventilation
-
Check surface dryness and temperature
What are the best application tips for spray foam insulation?
Apply foam in thin layers and allow curing between coats.
This improves efficiency and prevents issues.
Tips:
-
Warm and shake components
-
Spray borders first
-
Apply in layers (max 2 inches)